Indulge in Sweet Bliss with Brownie Bomb Bars
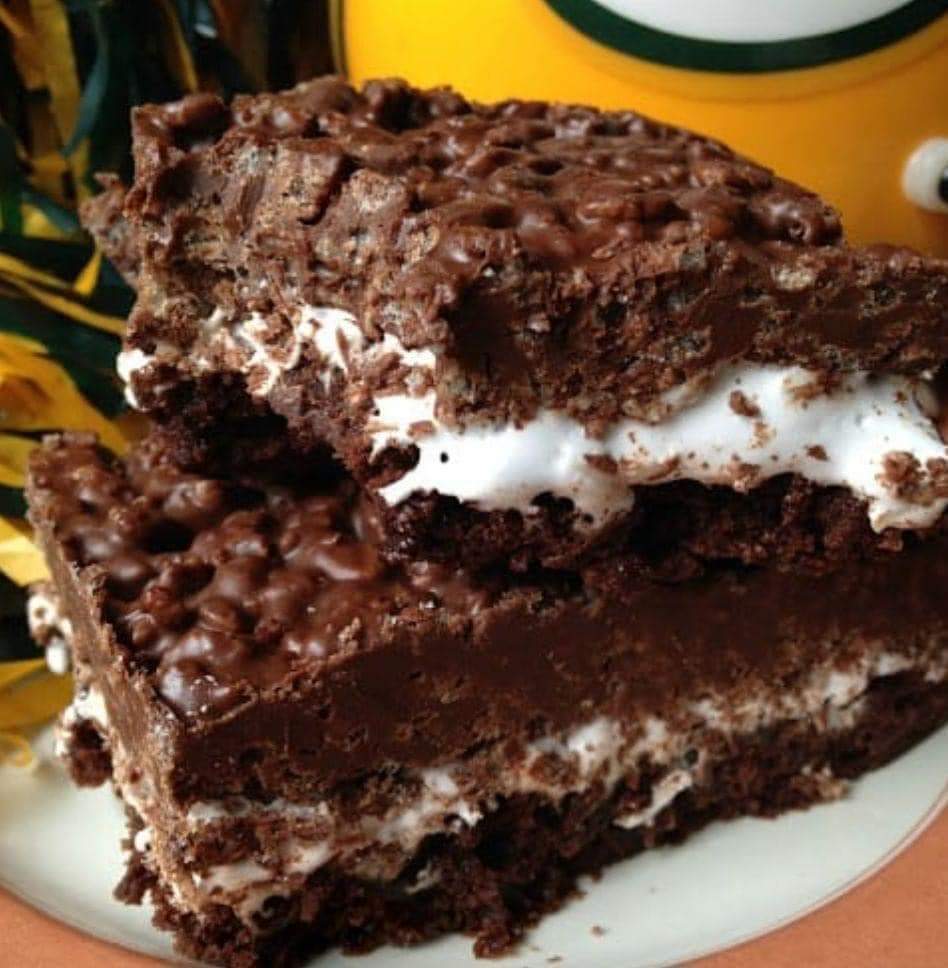
In the world of delectable desserts, there are few creations that hold as much power to captivate our taste buds and warm our hearts as the Brownie Bomb Bars. These delightful bars are a symphony of flavors, textures, and indulgence that can make anyone’s day brighter. Imagine a rich, fudgy brownie base, generously topped with layers of creamy cheesecake and a shower of chocolate chips – it’s a dessert lover’s dream come true!
Brownie Bomb Bars are the perfect combination of everything we love about desserts. Whether you’re a chocolate aficionado, a cheesecake connoisseur, or simply someone with a sweet tooth, these bars are sure to satisfy your cravings and leave you longing for more. The best part? They’re surprisingly easy to make, even for novice bakers, and they never fail to impress at gatherings and potlucks.
In this article, we’ll take you on a mouthwatering journey through the steps of crafting these heavenly Brownie Bomb Bars. You’ll discover the secrets to achieving the perfect brownie base – dense, moist, and packed with chocolatey goodness. We’ll guide you through the art of creating a velvety cheesecake layer that perfectly complements the brownie’s richness. And of course, we’ll explore the finishing touch that elevates these bars to a whole new level of decadence: a generous scattering of chocolate chips that melt in your mouth with every bite.
So, whether you’re a seasoned baker looking for a new dessert sensation or a novice eager to impress your friends and family, join us as we unveil the magic of Brownie Bomb Bars. Get ready to embark on a baking adventure that will leave you with a dessert so divine, it’s nothing short of an explosion of flavor – a true Brownie Bomb!
Ingredients:
Bottom Layer:
1 Box Brownie Mix (follow box instruction fully and for cooking times.)
2 Large Eggs
1/4 Vegetable Oil
1/4 Water
Middle layer:
1 Jar (198 g) Jet-Puffed Marshmallow Crème
Top Layer:
2 Cups Semi-sweet chocolate chips
1 Cup Peanut Butter
3 Cups Rice Krispies
How To Make Brownie BOMB Bars:
Spray a 9×13 pan with cooking spray.
Bake Brownies as directed on box and let to fully cool.
Spread Jet-Puffed Mallow Crème.
Place Chocolate chips and peanut butter in a medium-sized microwave bowl and microwave until well blended stopping at 1-minute intervals.
Once melted stir in Rice Krispies and spread evenly over mallow crème.
Cover and chill for two hours before cutting into squares
Yields 24-36 bars depending on how big you like your squares
Pro Tips for success :
Use Quality Brownie Mix: While you can make brownie batter from scratch, using a high-quality boxed mix can save time and ensure consistent results.
Don’t Overmix: When preparing the brownie batter, avoid overmixing. Just stir until the ingredients are combined to maintain that fudgy texture.
Smooth Layers: Use a spatula to evenly spread each layer, ensuring a well-balanced bite in every piece.
Peanut Butter Variations: Experiment with different nut or seed butters for the center to suit your preferences or dietary restrictions.
Nutrition Facts:
Serving Size: 1 Brownie Bomb Bar
Calories: 280
Total Fat: 15g
Saturated Fat: 5g
Cholesterol: 20mg
Sodium: 160mg
Total Carbohydrates: 34g
Dietary Fiber: 2g
Sugars: 25g
Protein: 5g
Conclusion:
Indulging in Brownie Bomb Bars is a heavenly experience that balances the richness of brownies with the creaminess of peanut butter. These delectable bars are sure to become a favorite dessert for both special occasions and everyday cravings. By following our easy-to-follow recipe and pro tips, you can create a batch of Brownie Bomb Bars that will leave everyone begging for seconds. Enjoy responsibly, and savor each blissful bite!
<<Carammelle>> offers you everyday fresh, fun and easy recipes. You can find the best quick and easy to make recipes, simple meal planning ideas and cooking techniques.
DID YOU MAKE THIS RECIPE?
How you went with my recipes?
Don’t forget to leave a comment below!